_edited.png)
_edited.png)
_edited_edited.png)

Altenew Educator Certification Program, Level 2 Class Submission for In the Mood for Color
- Kim Darling
- Sep 2, 2025
- 5 min read

Recipe: Sending Love

Ingredients:
Neenah Classic Crest Cover 100lb, Solar White/White or cardstock of choice
Kraft cardstock
Grey cardstock
Beige cardstock
Patterned paper
Altenew Doves in Flight Layering Die Set (sentiment)
Altenew Caribbean Life Layering Stencil Set
Altenew Caribbean Dreams Layering Die Set
Altenew Wooden Rowboat Die Set
Altenew Fresh Dye Inks: Arctic, Caribbean Sky, Persian Blue, Sapphire, Rocky Shore, Lava Rock, Sunray,Sunkissed, and Misty Morning
Altenew Metallic Watercolors: Gold Pearl, Sterling Silver and Topaz

Instructions:
Die cut and assemble the Wooden Rowboat; I used a combination of beige, gray and kraft cardstock for the
various pieces of the boat and oars then inked the bottom edge of the boat with Lava Rock to add some
shading. Die cut the lighthouse from the Caribbean Dreams Layering Die Set. Cut the rock formation from
Kraft cardstock and shade bottom layer with Lava Rock. Cut the tower from white or patterned cardstock
(used a blue burlap print paper), shade the sides of the tower with Arctic Ink. Cut the top of the tower from
white cardstock and color with Sapphire Ink. Die cut the sentiment, “sending love”, from the Doves in Flight
Layering Die Set; cut the actual sentiment from white cardstock and color with Sapphire Ink then cut the
sentiment shadow from Kraft cardstock-adhere sentiment and shadow together.
From white cardstock, cut a 4 ¼” x 5 ½” card panel. Use the first and second stencils from Caribbean Life, to
create the ocean and waves; the base layer (stencil 1) should be the lightest color (Arctic) with the darker
shades (Caribbean Sky, Persian Blue, Sapphire) being used to fill in the ocean waves (stencil 2). Using stencil
3, color in the beach with a combination of Rocky Shore and Lava Rock. For the sky, starting at the horizon
line above the ocean and going to the top of the card, color with a light application of Misty Morning to give the
impression of an overcast sky. Going back to the horizon line, apply a light, subtle layer of Sunray and
Sunkissed for the sunset. Above the sunset line, add clouds with stencil 4. For additional shine, I applied a
light layer of Topaz to the ocean waves, Gold Pearl to the beach and Sterling Silver to the clouds.
Adhere the lighthouse and rock formation to the right-hand side of the card at the beach line. Adhere the
rowboat and oars to the lower left-hand side of the card. Trim off anything that extends past the card panel.
Adhere the sentiment in the open space at the top of the card. Ink the outer edge of the card panel with
Sapphire. Adhere the panel to an A2 (4 ½” x 5 ½”) card base.

.
Recipe: Strong

Ingredients:
Neenah Classic Crest Cover 100lb, Solar White/White or cardstock of choice
Altenew Brushed Silver Cardstock
Altenew Fine Alphabet Die Set
Altenew Walnut Branch 3D Embossing Folder
Altenw Pink Star Tulip Die Set
Altenew Fresh Dye Inks: Misty Sage, Mossy Meadow, Green Opal, Peachy Keen, Snapdragon, Mandarin
Burst, Tangerine Dream, Autumn Blaze and Pure Graphite
Altenew Metallic Watercolors: Bronze and Jade
Bleed Proof White (or white paint)
Silver Pigment Ink

Instructions:
From white cardstock, cut a 4” x 5 ¼” panel. Dry emboss panel using the Walnut Branch 3D Embossing
Folder. Color panel with Pure Graphite going from dark on the outside, to light in the center. On your glass or
crafting matt, spray a small amount of water and using a small paint brush, mix a small amount of Bleed Proof
White (or white paint) into the water; splatter card panel liberally. Die cut, color and assemble the Pink Star
Tulip. Cut one flower and associated leaves from the die set using white cardstock. Color/blend Misty Sage, Mossy Meadow and Green Opal on the leaves, starting with the darkest color at the bottom of the leaves going to the lightest color at the top. Once dry, apply a light coat of Jade Metallic Watercolor to the leaves.
Color/blend Peachy Keen, Snapdragon, Mandarin Burst, Tangerine Dream and Autumn Blaze to the flower petals, going from the darkest color at the bottom of the petals to the lightest at the top. Once dry, apply a light coat of Bronze Metallic Watercolor to the petals. Once dry, assemble the flower according to the package directions. Adhere the leaves and flower to the bottom center of the embossed panel.From Silver cardstock cut a 4 ¼” x 5 ½” panel. Again, from Silver cardstock, die cut the word “Strong” using the Fine Alphabet Die Set. Adhere the “Strong” sentiment to the top center of the embossed panel. Adhere the embossed panel to the Silver cardstock panel and the Silver cardstock panel to an A2 (4 ¼” x 5 ½”) card base.

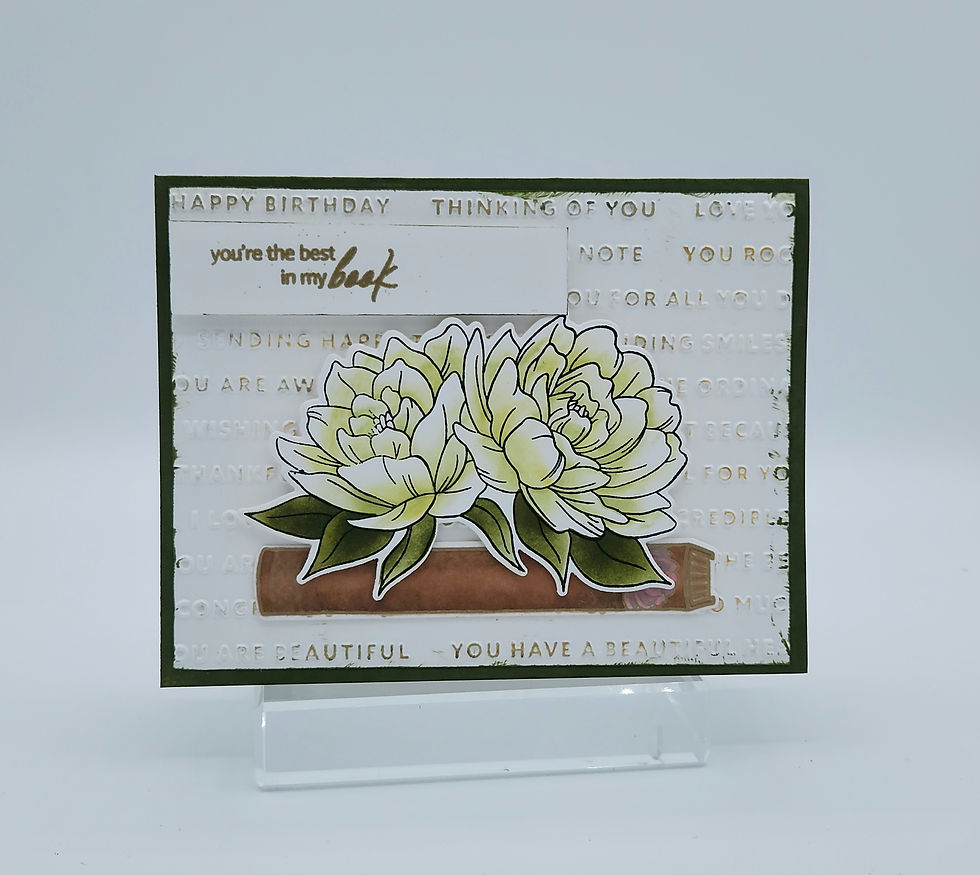
Recipe: You’re the best in my book
Ingredients:
Neenah Classic Crest Cover 100lb, Solar White/White or cardstock of choice
Altenew Literary Blooms Stamp, Stencil and Die Set
Altenew Raised Sentiments 3D Embossing Folder
Altenew Artist Markers: Rocky Shore, Sand Dunes, Lavender Fields, Frosty Pink and Jet Black
Altenew Fresh Dye Inks: Frayed Leaf and Green Opal
Altenew Antique and Enchanted Gold Metallic Pigment Inks
Altenew Antique Gold Embossing Powder
Altenew Embossing Ink

Instructions:
From white cardstock, cut a 4” x 5 ¼” panel. Dry emboss panel with the Raised Sentiments 3D Embossing
Folder. Lightly skim the Metallic Pigment Ink pads across the raised sentiments on the embossed panel in
order to highlight the sentiments. From white cardstock cut a 3 ¼” x ¾” sentiment strip. Stamp sentiment on
the strip using embossing ink and heat emboss with Antique Gold Embossing Powder.
On white cardstock, stamp and die cut the cluster of two flowers and the book end, using Jet Black for the
flowers and Antique Gold Metallic Pigment Ink for the book. Using the stencils, color the flowers with a light
application of Frayed Leaf, concentrating most of the color at the center of the flowers and leaving the tops of
the petals white. Again, with the stencils, color the leaves with Green Opal, applying a heavier coat at the base
of the leaves, leaving the top of the leaves lighter. With the Artist Markers, color the book end, using Rocky
Shore and Sand Dunes for the book cover, blending the inks so the center of the binding is lighter than the
outside edge. Use Lavender Fields and Frosty Pink Artist Markers to color in the small flower on the binding.
Die cut the flowers and book end.
From white cardstock create an A2 (4 ¼” x 5 ½”) card base. Using the Green Opal Dye Ink, color the outside
edge of the card base front, going in approximately ¼”. Adhere the embossed panel to the center of the card
base; the Green Opal will look like an additional color layer. Adhere the book end to the bottom center of the
embossed panel then, with foam tape, adhere the floral cluster just above the book end, allowing the leaves to
slightly cover it. With foam tape, adhere the sentiment strip to the upper left-hand side of the card, in line with
the edge of the embossed panel.


Incredible! Just amazing!